

How To Draw Anime School Girl Uniform
This detailed guide demonstrates to you how to Draw Anime & Manga School Boy & Girl Full Body in a School Uniform.

Stick with us till the end.
Vi steps to Depict an Anime School Girl
Contents
- 1 Six steps to Draw an Anime School Daughter
- one.one Stride 1 – Structure the Body
- 1.ane.1 Understanding the Guidelines
- ane.2 Stride ii – Draw the Facial Features
- 1.3 Pace 3 – Draw the Hair
- 1.4 Step 4 – Describe the Clothes
- 1.4.1 Drawing the Shirt, Sweater Vest & Ribbon
- ane.4.two Drawing the Skirt
- 1.4.3 Cartoon Socks and Shoes
- 1.5 Pace 5: Add together the Finer Details
- 1.5.1 Drawing the Apparel Folds
- 1.5.two Draw the Brim Fold Edges
- 1.five.3 Draw the Sock & Shoe Details
- ane.6 Step 6: Fill in the blanks with color and shading.
- i.6.1 Shading & Coloring the Face & Hair
- 1.half-dozen.ii The Trunk Area Shading and Coloring
- 1.half-dozen.3 Shading & Coloring the Skirt
- 1.six.four Shading & Coloring the Shoes & Socks
- one.one Stride 1 – Structure the Body
- 2 How to Draw Manga! Schoolhouse Uniforms Introduction
- 2.1 Girls Uniforms
- 2.2 Crewman fuku
- ii.3 Winter variety
- ii.iv Blouses and Jackets or Jumpers
- 2.v Skirts
- ii.6 Shoes and Socks
- 3 Manga School Daughter & School Boy Uniform Drawing
- 4 Conclusion

This footstep-past-step tutorial will show yous how to describe a daughter wearing a school or higher uniform in a iii-quarter perspective in anime style. It covers everything from the body's cardinal structure to a highly colored and shaded depiction.

Step 1 – Structure the Body

The most crucial step in sketching the body is to get the proportions right. Although the dimensions of anime characters vary significantly from those of actual people, the aforementioned principles apply.
The head is a useful method to gauge the size of the body. A regular trunk, including the head, may reach a height of 7-8 heads. However, because heads in anime are sometimes drawn larger than in reality, we'll apply 6.5 heads for this form.
Cartoon circles is a systematic approach to denote the joints. Of course, you don't accept to practice this, merely it can be beneficial.
The distance betwixt the trunk and the bottom of the legs is well-nigh the same as the combined height of the head and body.
The arms are significantly longer than the torso equally a whole.
Because of perspective, the distant side of the body (particularly the arm) volition appear smaller than the sections closest to the spectator.
Agreement the Guidelines

The blue lines in the image above are suggestions to assist you in drawing. The circles, as previously indicated, serve every bit separators and aid in infinite out the various portions of the body.
The oval drawn into the head aids in drawing the top of the head's class. You lot should sketch the entire oval since it makes it much simpler to detect if you've made a mistake. If you only sketch half of it, you may find that the second half does non announced properly.
The lines on the body serve to define its iii-dimensional grade. The centerline is utilized to assist perspective, every bit the farther away side of a iii-quarter view will be somewhat narrower than the closest side—the other line aids in determining where the body's forepart finishes and the sides brainstorm. Substantially, you want to sketch the body's original outline as a cake with sharp corners.
Pace 2 – Draw the Facial Features
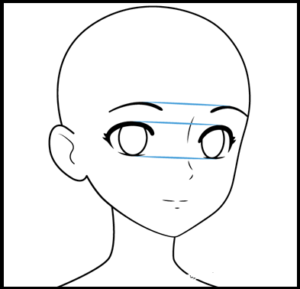
Nosotros won't get into the technicalities of cartoon faces in the anime style because there are already enough facial feature cartoon tutorials on the net.
Some keywords to keep in mind are that because the face in this video is created in three/iv view owing to perspective, the features on the far side of the face up will be rendered much smaller and lower down. Unless y'all're sketching a huge shut-up of the face, you may overlook this footling size variance.
Step 3 – Draw the Hair

Describe the pilus following the shape of the peak of the head and softly crimper in different ways as it hangs down for this specific hairdo.
When creating anime hair, you'll commonly want to depict it in clumps. Merely, for a more than natural effect, alter the size and direction they signal in.
For this and related designs, it's also beneficial to conceive hair as being separated into three sections: front, sides, and back for this and related designs.
Stride 4 – Draw the Clothes

Sketching the garments is coordinating to drawing the hair in certain ways. They will resemble the body'south outline in certain ways.

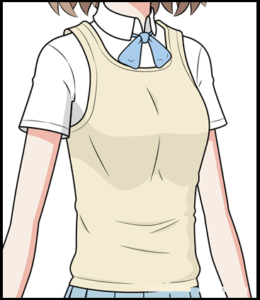
Drawing the Shirt, Sweater Vest & Ribbon

Draw the sleeves rather loosely for this shirt and the collar hugging the neck because the ribbon will keep it tight to the neck. Remember that the far side will be smaller owing to perspective when cartoon the ribbon again.
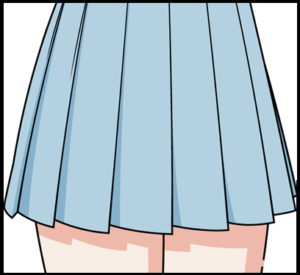
Drawing the Skirt

In anime, schoolhouse uniform skirts frequently have abrupt folds that bend around the torso. In add-on, the skirt has a cone-similar form to it, with the summit chopped off.
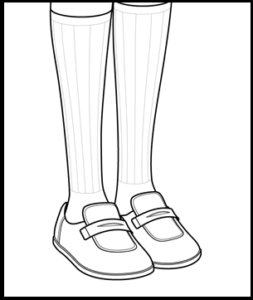
Cartoon Socks and Shoes

In the case of long tight socks, they will almost perfectly fit the profile of the legs. Therefore, the shoes will approximate the shape of the foot.
Step 5: Add the Finer Details

Create the finer elements of the confront and clothing. Afterwards completing this stage, y'all should accept a completed outline sketch of an anime girl in a schoolhouse uniform.
Cartoon the Apparel Folds

Brand some folds in the fabric. Most of these will be around the bottom, where the garments begin to droop, and areas such equally the armpits, where pressure is given to the fabrics.
Depict the Skirt Fold Edges

To provide a inkling of the skirt'south edges, draw some lines. Unfortunately, these will only be seen on the left side of the artwork since the folds will gradually twist to the right, obscuring the other side of the fold.
Draw the Sock & Shoe Details
Draw some lines along the leg curve to point the pattern of the socks for the socks. These should be drawn extremely softly. Keep in mind that the legs are circular. Thus the space between these lines should exist bigger at the heart of the leg that faces the viewer and smaller with each subsequent stripe equally the leg curves more and more than.
To make the shoes appear more than intriguing, you may simply add the tiny features of their design.
Step 6: Fill in the blanks with colour and shading.

The first pace in coloring an anime figure is simple: color each region with the proper color.
"Cel Shading" is the shading technique utilized in anime. Cel shading is the process of shading a graphic without using any gradients.
We'll start by because our light source to make the shade more realistic. It will be on the upper left of the cartoon in this scenario. As a event, the shadows volition fall to the bottom right.
The neck, below the breast, the skirt, and the right side of everybody's region will have the most shadows.
Shading & Coloring the Face & Pilus

The hair, nose, and bottom lip will throw the most prominent shadows on the face. On the eyelids, there will be some shade. The head's shadow will also throw a significant shadow on the cervix.
The darkened portion of the hair will exist the inner rear part of the hair. You may likewise utilize highlights to give your hair a more lustrous appearance.
The Torso Area Shading and Coloring
Equally previously stated, the predominant shadow for the torso area will be below the chest. In addition, there will exist a smaller shadow around the folds, and a shadow on the bottom right of the vest since the vest is facing away from the lite source.
Shading & Coloring the Brim
The shadows for the brim will be within the fold sections. The shadows will get less evident equally the folds get closer to the right side of the artwork. In addition, the skirt volition produce a shadow on the legs.
Shading & Coloring the Shoes & Socks
Socks and shoes will only have shadows along the correct side of the body, much like the trunk. However, you'll desire to add together some reflections to the shoes to requite them a gleaming advent. Make sure the highlights aren't as well dazzling. Otherwise, the shoes may appear to be made of drinking glass.
How to Describe Manga! School Uniforms Introduction
The schoolhouse environment is a popular motif in manga and anime. Frequently, the grapheme wears the school uniforms all of the time (even when halfway across the world, looking at you, Jotaro). Although nigh school uniforms have a similar advent, differences may be a crucial design element of the character.
Girls Uniforms
School uniforms for girls usually consist of a shirt and skirt, with socks or leggings. In the cooler months, they might clothes in sweaters, vests, or blazers. Variations on this broad concept tin can be approached in a diversity of ways.

Sailor fuku
This is a traditional girls' compatible inspired past a sailor adjust and features a thick collar pulled into a point and folded over the back in various 'flap' fashions. Instead of being buttoned upwards like a shirt, it is pulled over the head and has a broad neck. It's usually composed of a heavier cotton, with a stiff collar that doesn't crumble easily.
Depending on the flavour, sleeves might be short or long. On the outside, either a scarf with a clasp (typically a school insignia clasp) or a ribbon of any size is worn below the neckband. A short length of cloth or a skivvy is worn behind the collar (which tin be nothing because it is relatively open). Fifty-fifty before because color, there are a plethora of styling alternatives. To learn more about the Sailor fuku's variants, click on the links below.
There are two variants on the front in this extremely basic specimen and three form variations on the rear (other shapes are also used, and these iii common ones). In add-on, the curt clasped ribbon with or without stripes and the bow size and kind vary.
Wintertime variety
In the winter, Sailor fukus have a wide loose jumper or come up in a thicker, longer variation for the colder months. Regardless of how frequently the colour changes, for example, in Cardcaptor Sakura, the summer version is short and white with blackness stripes and a red scarf, but the winter version is black with white stripes and a cherry-red scarf, providing some multifariousness during the colder months. Warm coats and other accessories are normally left to the discretion of the private and might vary co-ordinate to their style.
Blouses and Jackets or Jumpers
Blouses tin feature a variety of collar forms, equally well equally scarves, lapels, ribbons in a bow, or even a tie. Sleeves might be puffy and short or straight and long.
A blouse can be worn with a cardigan of any length, a jumper, a vest, a cardigan, or a jacket in the wintertime. The colors are either symbolic of or opposed to those of summertime.
This basic sample shows two distinct cardigan lengths, one with a short necktie and a pocket-size bow. The second example is a pair of fitting blazers in two different styles. The one on the left is longer and has a centerline, while the one on the right is a cross with numerous buttons.
The style and colors selected are often complementary to the remainder of the uniform, with recurring motifs (stripes or colour, for example). The jacket can exist worn at or below the waist, although information technology is commonly a fitting pattern. A looser cardigan, maybe with a fitted vest underneath, is an culling.
Skirts
Pleats (either sewed down the length or created at the waist) are used to add interest to near skirts, whereas an A-line is designated for office ladies and instructors. Short on the thigh (unremarkably used for panty injections), higher up the knee, and below the genu are frequent lengths. Total-length skirts are not common, although three quarter length skirts tin exist used as well. The skirts are typically made similarly, with a non-pleated waist section and the remainder of the skirt produced from the waist.
This crude sample illustrates the aforementioned length only varied pleats; normally, many wrinkles are unusual in art since they are difficult to depict; soft pleats are preferred for their ease of usage. A skirt with a button or clasp on the side or back is typical.
Rather than being split down the side, the majority of the skirts are footstep-in styles. In any case, it'southward difficult to discern the difference while sketching the brim existence worn.
Skirts might be plaid, solid-colored, or have many stripes to match the rest of the uniform. They're rarely 2-toned or transparent (unless you go to Magic School ).
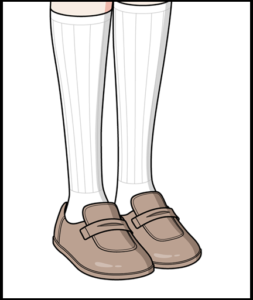
Shoes and Socks
In the winter, socks are normally high (or leggings if suitable), and regular shoes (flat shoes with no heels or boots) or joggers. Stockings or colored leggings can also be worn, only they should be solid-colored rather than patterned, equally bright patterns appear to exist designated for flamboyant moms. Finally, when the pupils arrive at schoolhouse, they change into Uwabaki, which are indoor shoes.
I have also written a cursory guide on Anime school shoe drawing, please follow the hyperlink Anime School Shoe cartoon
An example of puffy pushed-down socks or leggings with brown or black normal school shoes is shown below. Direct socks and uwabaki are demonstrated in the second instance.
Manga School Daughter & School Boy Compatible Drawing
Look at some of your favorite anime and manga artists' school uniforms and encounter how they created them. Await for common aspects that you lot similar, such as skirt length and color, and outset sketching upwardly some mock-ups of what yous want for your grapheme. It's your decision, so accept fun with it!
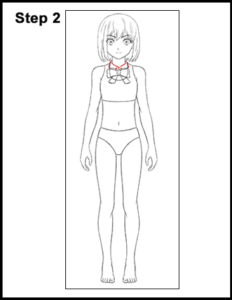
Afterwards you've completed your Manga Daughter Full Torso pattern, add the school uniform, commonly known equally a "Seifuku," by following the step-past-step instructions below. Each footstep's new lines are highlighted in red, so you lot'll know precisely what to draw adjacent. Permit yourself to sketch at your speed.
Intro: Brainstorm with a crude sketch in pencil. Don't apply too much pressure level in the beginning. To make it easier to erase if you make a mistake, depict lightly at outset for each stage.

Depict a piddling bow below the manga girl'southward cervix, right between her collar bone and the U-shaped collar. The bow comprises two smaller triangular forms on the sides and a lilliputian oval-similar shape in the centre. The triangular sides and corners should be curved. Adjacent, add a pair of short, rectangular shapes for the bow's ribbons at the lesser.
For the shirt collar, describe a sequence of curving lines around the manga girl's neck above the bow. Because the collar is behind the bow, don't overlap the grade of the bow.

Draw a pair of long, sloping lines for the glaze lapels on the sides of the bow. Identify the lapels using the girl's pinnacle straps as guidance. To produce two short forms on either side, the fundamental one-half of the lapels should curve in toward the bow. The bottom border of the girl's top should exist where the lapels terminate.

Draw the girl's coat on the left side by using the torso contour every bit a reference. Place the coat line a picayune more to the left of the exterior border of the body. Place the coat'south inside border towards the omphalus. Forth the side of the hip, the bottom one-half of the glaze should bend to the left. Draw a tiny rectangle for the coat's pocket effectually the centre of the class.

Draw the other side of the female's coat similarly to the showtime, just in the other direction. Draw the line for the outside edge of the glaze further to the right, post-obit the course of the trunk. Curve the lower half of the coat to the right and make a lilliputian rectangle for the pocket towards the centre.

To create the coat's first sleeve, trace the route of the daughter's arm on the left. Keep the sleeve's edge as most to the arm'due south sides every bit possible. Make the shoulder surface area for the coat'southward pad as wide every bit possible. For a seam, depict a diagonal line from the shoulder to the trunk. Maintain a consistent sleeve width, even when the wrist narrows at the bottom. Finally, make a cuff line towards the bottom of the sleeve.
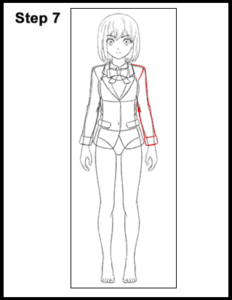
Draw the other sleeve of the garment in the aforementioned way equally the manga girl's right arm. To sketch the outline of the sleeve, trace the border of the arm. Brand the shoulder region a little broader for the pad, and add a sloping line for a seam within. Go on the sleeve broad down to the wrist. Describe a line for the cuff at the bottom.

Beneath the coat, draw the outside form of the girl'south skirt. The skirt's sides are composed of long, vertical lines that camber outward. When cartoon the sides of the skirt, don't overlap your hands. A long, curving, horizontal line runs down the lesser of the skirt. Identify this line a few inches higher up the knees. You may make the skirt equally long or every bit short as yous desire it to be to insert pleats in the side by side stage, making the bottom edge of the skirt a little wavy.

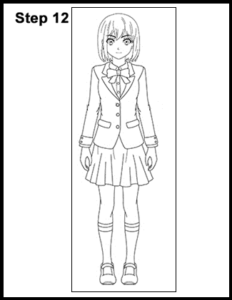
Throughout the girl'south outfit, add a few more embellishments. Draw two little circles for buttons in between those lines. For extra buttons, draw 3 more little circles effectually the coat'southward central border. Next, describe four different little circles on the outer ends of the coat's cuffs for more buttons. Next, add a line beneath each sleeve to represent the cuff of the garment. Finally, draw a sequence of long, vertical lines inside the skirt to represent pleats. Slightly slant the pleat lines.

For the socks, top edge and a stripe, depict three brusk, curved, horizontal lines below the girl's knee on the left. Draw a curving form around the foot for the shoe at the bottom. For a shoe strap, draw a narrow curved course over the peak of the pes. Next, draw a little rectangular shape for the shoe'south entrance on the meridian one-half of the foot. Finally, draw a pair of small, curving lines for the forepart of the shoe below the toes.

Repeat the sock and shoe drawing on the girl's second leg. For the sock and stripe, draw iii curved lines at the peak. For the basic shoe, draw a curving from around the foot. Adjacent, depict a curving form for the shoe's strap and a tiny, rectangular shape for the shoe'south aperture at the acme of the pes. Finally, draw a pair of lines for the front of the shoe beneath the toes.
Go over the terminal lines with a pen or marking to brand your manga girl in a school uniform drawing permanent. To avoid mistakes, ink slowly and carefully. Ink only the parts of the torso that are visible behind the garments. After the ink has stale, utilize an eraser to remove whatsoever pencil marks.
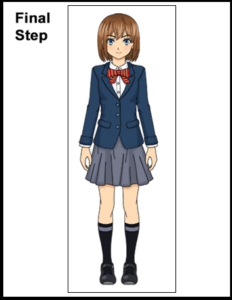
Last merely not to the lowest degree, color your manga girl drawing! This sketch was digitally colored, but a similar effect may be accomplished using color pencils, markers, or crayons! Colour a few streaks in the heart of the pilus with light brown for highlights. Regular brown should be used for the remainder of the hair, just the highlights should non be overlapped. Dark brown should be used on the acme and bottom of the hair. Begin by coloring softly and gradually blending the colors. So, simply color the unabridged pilus a solid chocolate-brown hue with no highlights for a simpler drawing. You lot are also gratuitous to employ any other color you want. Use dark-green, yellow, majestic, or any color you lot wish for the hair because manga characters are always colorful. For the optics, utilise blue.
For the peel, use peach. For some shadows, use a calorie-free brown all over the peel. Blush with a touch of pink on the cheeks. The glaze should be nighttime blue or navy blueish. The glaze's buttons should be pale blue. To make a striped design, paint the bow in ruby-red and orange. For shadows, add a smidgeon of light grey to the white shirt. The skirt should exist grey, as should the stripes on the socks. Socks and shoes should be black. Make the shoe tips a petty lighter for shine. For the bottom half of the fronts of the shoes, use light grey. If you like, you may even change the colour of the outfit. The glaze should be dark red or dark green, and the skirt should accept a checkered blueprint! That concludes our discussion.
Post-obit the step-by-step images below, add together the school uniform, commonly known as a "Seifuku," to your Manga Boy Full Body design. Each step's new lines are highlighted in blood-red, so you'll know precisely what to draw next. Then, allow yourself to sketch at your speed.
Brainstorm with a rough sketch in pencil. Don't apply besides much force per unit area in the beginning. To get in easier to erase if yous make a fault, draw lightly at get-go for each phase.

Begin by cartoon the collar of the boy'due south shirt correct beneath his neck. The middle of the neckband resembles a large letter X. Two curving lines proceed the sides of the collar. Make sure the collar isn't too big. Adjacent, wrap the shape's sides effectually your neck. The lesser tips should take a piffling overlap with the collarbone.

Draw a pair of long, sloping lines for the coat lapels on the sides of the male child's neckband. These forms should have a broad top and a small lesser, and they should come to a bespeak beneath the breast. The outside lines of the lapels should be angled inward on both sides to produce two pointed forms.

Depict a little V-shaped line for the tie knot at the acme, in the heart of the boy's shirt collar. Draw a couple of lines for the bottom one-half of the tie below the knot that slanted outward slightly.
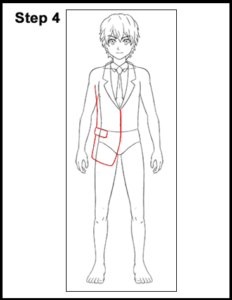
Draw the left side of the manga male child's coat using the body shape as a reference. Place the coat line a piddling more to the left of the outside border of the body. Place the glaze's inner line at the umbilicus. Along the side of the hip, the bottom half of the coat should bend to the left. Draw a tiny rectangle for the glaze'southward pocket around the center of the grade, on the left.

Draw the second side of the male child'southward coat in the aforementioned manner merely the other direction. Describe the line for the outside edge of the coat a little more to the correct, post-obit the direction of the torso. Curve the lower half of the coat to the right and make a little rectangle for the pocket towards the centre.

To design the coat's first sleeve, trace the route of the boy's arm on the left. Continue the sleeve'south edge as near to the arm's sides as possible. Make the shoulder expanse for the coat's pad every bit wide as possible. For a seam, describe a diagonal line from the shoulder to the trunk. Maintain a consequent sleeve width, even when the wrist narrows at the lesser. Finally, make a cuff line towards the bottom of the sleeve.

Describe the other sleeve of the glaze in the same mode every bit the manga male child'south right arm. To sketch the outline of the sleeve, trace the border of the arm. Brand the shoulder region a little broader for the pad, and add together a sloping line for a seam inside. Keep the sleeve wide down to the wrist. Describe a line for the gage at the lesser.

To draw the first pant leg, trace the route of the boy's leg on the left. To avert the pants condign excessively amorphous, keep the line for the pants nigh to the side of the leg. If you desire skinnier trousers, bring the width of the pant leg closer to the ankle at the bottom. For the creases along with the knee, make the form a little more than angular in the centre.

Draw the pants' second leg the aforementioned mode as the manga boy'south leg on the right. Depict the profile of the pant leg by following the border of the leg. Maintain an equal width on both sides. Make this side sparse at the lesser if you lot made the left side narrow at the bottom.
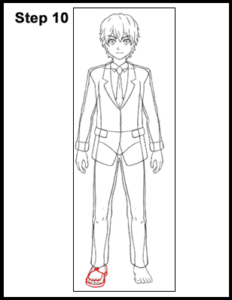
For the male child'south shoe, draw a curving class around the pes on the bottom, left side. As you sketch the shoe, proceed the pes's shape in mind, but move the shoe'southward edges away from the human foot. Adjacent, draw a pair of brusk, curved lines for the design and laces at the tiptop of the shoe.
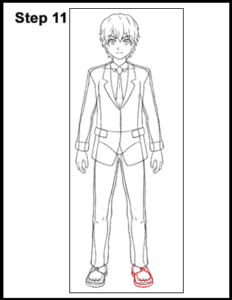
Echo the process with the boy'southward 2nd foot. Outline the shoe effectually the foot by post-obit its course. Add together a few short lines for the blueprint and laces at the top and a couple more curved lines for the bottom.
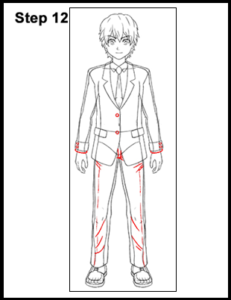
Finish the male child's compatible with a few more embellishments. Draw two little circles for buttons around the glaze's fundamental edge. Next, depict two different niggling circles for more buttons on the exterior borders of each of the coat's cuffs. Next, add a line below each sleeve to represent the cuff of the garment. Finally, draw a serial of wrinkles and folds on the cloth for pleats and folds inside the pants.

Go over the concluding lines with a pen or marker to make your manga boy in a school uniform drawing permanent. To avoid mistakes, ink slowly and advisedly. Ink only the parts of the body that are visible behind the garments. After the ink has dried, utilise an eraser to remove any pencil marks.
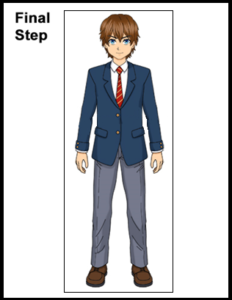
Terminal but not least, colour your manga boy drawing! This sketch was digitally colored, but a similar effect may be achieved using colored pencils, markers, or crayons! Color a few streaks in the center of the hair with light brown for highlights. Regular chocolate-brown should be used for the residual of the hair, just the highlights should not be overlapped. Night brown should be used on the elevation and bottom of the pilus. Brainstorm by coloring softly and gradually blending the colors. Then, color the entire hair a solid brown hue with no highlights for a simpler cartoon. You are also gratis to use any other hue you choose. Use greenish, yellowish, regal, or whatsoever color you wish for the pilus because manga characters are always colorful. Make the eyes blueish. For the skin, utilise peach. For some shadows, use a light brown all over the skin.
The coat should be dark blue or navy blueish. The coat'south buttons should exist xanthous. To make a striped design, dye the tie in scarlet and orange. For shadows, add a smidgeon of light grey to the white shirt. The pants should be grey, and the shoes should exist dark-brown. If you similar, you lot may even alter the colour of the outfit. For the coat, choose nighttime red or night light-green, and any other color for the pants! That concludes our discussion. Continue practicing until you go the physique and proportions you want.
Conclusion
This course contains a lot of information and may be hard to understand. To make things a piffling easier, practice cartoon various components of the pedagogy on your own.
Related Article's
How to describe Anime and Manga Wing'south
How to draw Anime and Manga Eyebrow'south
The Ultimate Guide on Anime and Manga Shoes drawing
4 Piece of cake Ways to Describe Crying and Upset Anime with Tears
How to draw Anime and Manga Noses
Anime Natural language out face Drawing
How to Draw Anime Weather
How to Draw Freckles on the Anime Face
See Also
Acme xx All-time School Daughter Anime Characters Of All Time
The Acme List of Anime series Where a Boy Goes to an all Girl School

How To Draw Anime School Girl Uniform,
Source: https://drawinganimeandmanga.com/how-to-draw-anime-and-manga-school-boy-and-girl-full-body-in-a-school-uniform/?utm_source=rss&utm_medium=rss&utm_campaign=how-to-draw-anime-and-manga-school-boy-and-girl-full-body-in-a-school-uniform
Posted by: woodsgail1951.blogspot.com
0 Response to "How To Draw Anime School Girl Uniform"
Post a Comment